
.jpg)
- Scan the bracket, save it as a JPEG
- Import it into Studio
- Change the Drawing Scale in Studio as 1 to 1
- Trace around the bracket (use the Close Beizer Tool)
- Measure your bracket, with the dimension tool draw a line the correct length
- Hold down the shift key and click on the corner edit point and resize the bracket to the correct size. (your scan decreased the actual size)
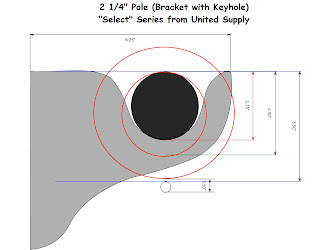
- Measure the diameter of the pole
- Draw a circle and change the circle to the size you measured for the pole (hold down the shift key to ensure a perfect circle)
- Measure your ring or use the specifications given by your vendor
- Draw two circles, change the dimensions to the specifications given by the vendor for the inside dimension of the ring and another for the outside dimension of the ring. Use the Align to center tool, make sure both the center and outer circles are selected.
.jpg)
I have attached two files to get you started. 2 1/4" Select Hardware from United Supply and 2" hardware by Kirsch. Here is a link to the United Supply Select Product.http://www.selectdraperyhardware.com/products/13-108/3/
Warning Vendors can make changes to hardware without notice so always double check the templates by printing and laying the bracket on the template to assure accuracy.
The MMS file can be edited to match the changes, just duplicate the page, edit the hardware to the new specifications on the new page and make a note on the file.
Find the downloadable files on "The Lounge" http://www.minutesmatterstudio.com/forum/showthread.php?t=2845


